eRes / NebulaCRS and PMS Interface Guide
1. INTRODUCTION
OTA_PMS is an interface developed based on the OpenTravel standard which facilitates communication between eRes® and PMS. Communication is in the form of XML messages as its primary purpose is to facilitate the sharing of structured data across different information systems, particularly over the Internet. The transport mode is by means of HTTPS which ensures the secure delivery of messages to both parties.
Communication includes making, amending and canceling of reservations (eRes® to PMS), creating and modifying Profiles (eRes® to PMS), deleting Profiles (eRes® to PMS), creating and modifying Rates (eRes® to PMS), Availability updates (PMS to eRes®) and Booking restrictions.
This document provides an overview of the OTA_PMS interface as well as the configuration involved in setting up the interface between eRes® and PMS.
1.1 Licensing Structure
The OTA Apex interface to eRes is licensed as a separate module. To apply for this you need to send an e-mail to the HTI Sales team – sales@htihospitality.tech Once the quote is signed, our technical team will update your eRes & Apex licenses to include the Apex / eRes interface.
1.2 Connectivity
Both Apex & eRes have to be connected to the Internet, if not permanently then at regular times during the course of the day. It is not uncommon for a CRS hub to install a dedicated Internet link for this purpose. Where infrastructure or other factors prohibit this communication link then an ad-hoc connection will do.
The interface is currently a 1.5 way interface only. Communication between eRes® and PMS is initiated by the PMS which sends a request message containing the connection details of the originating Property to eRes® indicating that it wants to download messages that are waiting to be downloaded. eRes® then responds by either sending the accumulated messages in its queue or it responds with an empty message indicating to PMS that there are no messages to download.
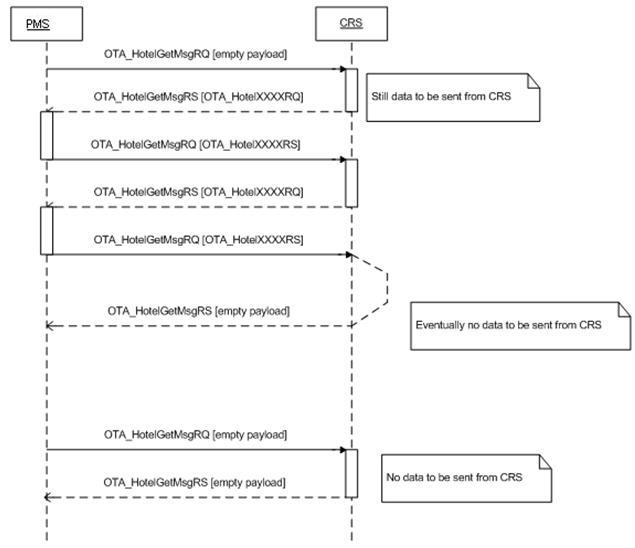
Figure 1. Sequence diagram shows the sequence of messages between PMS and the CRS.
2. APEX (OTA PMS) INSTALLATION PROCEDURES
The client will need to contact HTI to request eRes & Apex to interface. The client will be quoted and only once HTI has received a signed acceptance form back, will HTI issue a new eRes license.
The client should inform the property that an interface has been requested.
Once the property is ready, the client must contact HTI to start the process of activating and mapping the two systems. HTI will need to dial into the server via the Zoho Assist application (a link will be shared by the agent).
HTI will map the two systems accordingly. However, the client needs to confirm which properties and rooms needs to be mapped.
3. ERES CONFIGURATION PRIOR TO ACTIVATING THE INTERFACE
It is important that the information that will be sent between eRes and Apex will now meet the OpenTravel standards. Herewith the eRes configuration that must be done by the system administrators:
3.1 Property and room configuration
eRes and Apex must have the exact same property configuration. The Apex interface on eRes is based per property and not per instance.
The rooms must also be built the same in both systems. If you have 3 Double Rooms in eRes, then 3 Double rooms need to be on Apex.
If eRes and Apex does not have identical property and room configurations, the interface will not be working correctly.
You are allowed to have more room types in Apex than in eRes. You must advise HTI which room types must not be sold / made available to eRes.
3.2 Titles
The Title field in the Guest Details Tab of each reservation may not be blank.
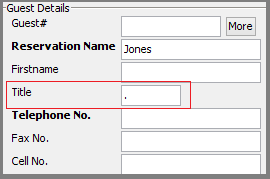
Figure 2. Guest details page from a Reservation in eRes.
The Ttitle configuration is located under System Administration > System Codes > Titles.
Ensure that a possible blank field now contains a character. Once edited, this will update all the reservations in eRes automatically.

Figure 3. Title configuration page.
Please note that reservations with blank title fields will not send to the PMS and will cause an error in the eRes PMS Interface Monitor Error logs.
3.3 Country codes
OTA_PMS interface country code specifications is based on ISO 3166 A 2 Codes.
This means that all country codes must be 2 characters long.
The Countries configuration is located under System Administration > System Codes > Countries. Once edited, this will update all the reservations in eRes automatically.
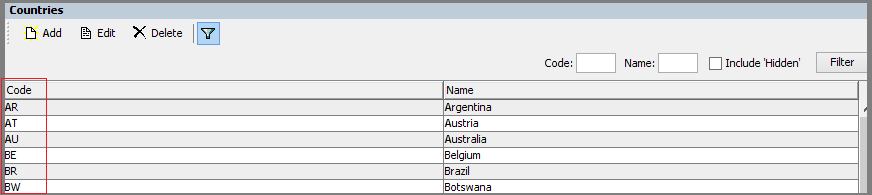
Figure 4. Countries configuration page
Please note that agent profiles and reservations with incorrect countries linked to them will not send to the PMS and will cause an error in the eRes PMS Interface Monitor “Error” logs.
3.4 Reservations with no rates
Rates in eRes must be available and valid at all properties and on all room types.
However, this might not always be the case as rates for upcoming years might not be available yet and therefore not built in eRes. Should this be the case, and reservations are made over these periods, the eRes reservation will show the following on the itinerary line: Rate TBA
Figure 5. Ininerary line
The OTA_PMS interface will not recognize the above as valid rate amounts. You therefore need to either update the rates on eRes or override each reservation with a valid rate amount.
Please note that reservations with no rates will not send to the PMS and will cause an error in the eRes PMS Interface Monitor Error logs.
3.5 Special characters
The XML messaging cannot support certain special characters or symbols (such as ©, € etc.).
You need to go through all eRes rates, agent profiles, reservation information, etc. and remove the special characters as this will prevent the reservations from being made successfully in the Apex PMS.
Please note that agent profiles, rates or reservations with special characters or symbols will send to the PMS, but as the error is on Apex, it will not notify eRes of the error. The reservation, however, will remain in the PMS Interface monitor “Waiting for response” logs as no response message would have been received from the PMS.
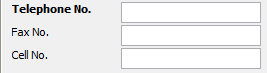
3.6 Telephone, fax & cell numbers in reservations
The OpenTravel standards have limitations regarding the maximum number of characters used in the reservation telephone, fax & cell number fields.
The information captured in these fields may not exceed 32 characters (including the spaces).
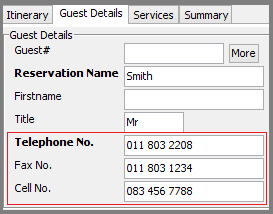
Figure 6. Guest details page from a Reservation in eRes.
Please note that reservations with telephone numbers that exceeds 32 characters will not send to the PMS and will cause an error in the eRes PMS Interface Monitor “Error” logs.
3.7 Allocation names
The eRes interface to Apex does not support sending allocations to the PMS. However, the interface will send the reservations that is booked off allocations. The OpenTravel standard has a limitation on the amount of characters that may be used for Allocation Names. It may not exceed 16 characters (including the spaces).
The Allocation configuration is located under System Administration > Agents > Allocations. Once edited, this will update all the reservations in eRes automatically.
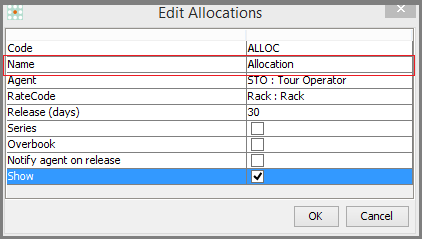
Figure 7. Allocation Configuraiton page
Please note that reservations booked against allocation names that exceeds 16 characters will not send to the PMS and will cause an error in the eRes PMS Interface Monitor “Error” logs.
3.8 Group Reservations
The OpenTravel standard has a limitation on the amount of rooms that can be booked per itinerary line.
The eRes administrators must go through all eRes reservations and ensure that no bookings have itinerary lines that exceeds 99 rooms.
Figure 8. Reservation Itinerary line
Please note that reservations with itinerary lines that exceeds 99 units will not send to the PMS and will cause an error in the eRes PMS Interface Monitor “Error” logs.
4. GENERAL CONFIGURATION AND SETUP NOTES
Below are the general supported interface features.
5. CONFIGURATION & SETUP IN ERES
The configuration and mapping can be done in eRes and Apex once you and the property have agreed what information must be synchronized.
5.1 Mapping the property to the interface
The OTA_PMS Interface is used to interface with the eRes® Central Reservations System by using xml messages. This interface can perform a variety of functions for example reservation delivery from CRS to PMS, availability upload from PMS to CRS, etc.
Should any of the eRes or Apex property or room codes be changed, without the mapping being updated ON BOTH SYSTEMS, the interface will no longer work.
The interface configuration is located under System Administration > Properties > Properties > Edit Property

Figure 9. Edit Property Interface page in eRes
STEP 1: Property interface Settings Window Configuration explained:
The Property Interfaces settings window is configured as follows:
STEP 2: Inventory type mapping configuration explained:

Figure 10. Edit Inventory screen.
6. TESTING AND ACTIVATING THE INTERFACE
Once the mapping is complete the systems are now ready to be tested by the HTI consultant.
6.1 Apex’s connection to eres
HTI will use the following link to connect from Apex to eRes.
Possible Servlet URL's to be able to connect to eRes:
The above URL should have been opened on the Apex server firewall, anti-virus and internet settings.
To test the connection between the two systems, the HTI Consultant need to copy and paste the URL into the Apex server web address bar. The eRes version should appear.
Figure 12. Web Screen after URL is pasted into address bar
If it does not appear on both HTI Consultant pc and on the server, it means the issue is on eRes.
If it does not appear on only the Apex server, it means that there is a possible firewall, anti-virus or internet settings that still need to be configured on the client server.
6.2 Availability upload
Where eRes® is interfaced with PMSs it may have been configured to receive availability uploads from the Properties connected. Uploading availability takes place at intervals set by the system Administrator on the Property master file. eRes® changes the color of the Property name and Inventory when the upload interval has been exceeded with no successful upload of availability. The Property name and its associated Inventory changes from white to red on the Density chart when this situation arises, which should indicate to a supervisor or manager that investigation is required. Mouse over an interfaced Property to activate hinting pertaining to the last update date and time.
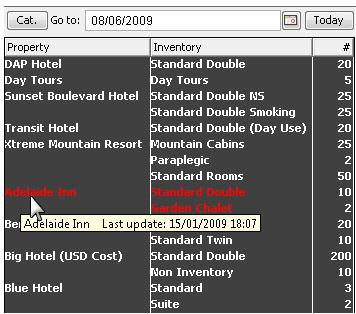
Figure 13. Inventory screen
Property and Inventory appears in red indicating the update interval has been exceeded with no successful availability upload – the interface or internet connection at the property could be down. Once a successful upload is received, the color changes to white.
When you right click on the Inventory room type and date and select “Reservations For”, you will be able to see the number of rooms as specified by the PMS:
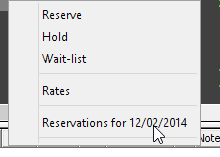
Figure 14. Right click on room type on Inventory screen.

Figure 15. Reservations For screen
The availability between the eRes inventory grid and Apex must match exactly. If not, it might mean that not the same amount of units was built on the systems or the room codes was mapped incorrectly.
6.3 Test reservations
The HTI consultant will make one individual reservation and one Group type reservation in eRes.
The consultant will confirm that all the information pulled through successfully to the PMS.
Herewith the information that must be tested:
Individual reservation type with more than one room type
Group reservation type with more than one property
Deposits captured across the different room types and properties
Reverse deposits
Client information
Service
Memos
Rates
Agent profile
Special Requests
Reservation amendments
Cancellation of reservations
Once all the above test scenarios pulled through successful results, the HTI consultant is now ready to send the eRes reservations to the property.
7. MANAGING THE INTERFACE IN ERES AND THE INTERFACE MONITOR
The functionality contained in the PMS module of System Administration is used daily for monitoring PMS interface activity and PMS availability updates received. In addition to these daily tasks this module allows for batch submission of future reservations, rates, Allocations and Agents in the system synchronization phase of new installations (CRS to PMS). Last but not least PMS module offers a Message Log Viewer to enable support of these interfaces.
7.1 Availability Update Monitor
The Availability Update Monitor logs all availability updates as received from the PMS. The Property concerned, Inventory concerned and the update date and time is logged in the Monitor. When log entries are highlighted they may be copied to clipboard by using the ‘Copy’ function.
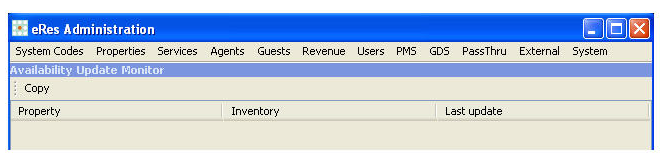
Figure 16. Availability Update Screen
7.2 Rate Download to PMS
Apex does not support this functionality.
7.3 Agent Download to PMS
Primarily also used to send either a bulk load or single selected Agent(s) to a Property, or to multiple properties. This function, like the functions prior to this, is ultimately used to update a new Property during the go-live process. The Agent master file details will be sent down to the Property.
Go to Tools / System Administrator / Interfaces / PMS / Send Agents.
Select the agents you want to send through the interface and also specify which properties.
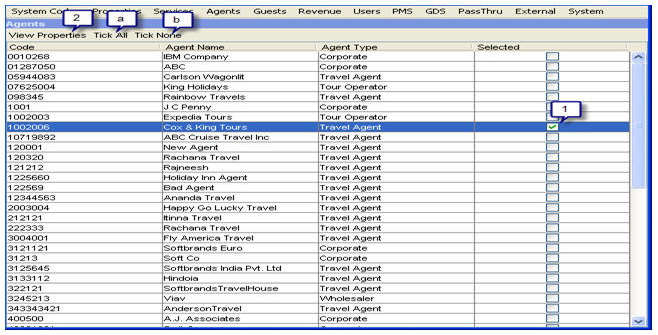
Figure 17. Interface Send Agents Screen
Legend:
Select the Agents that you wish to send down
Select View Properties to see which Properties are listed for sending the Agent to
Tick all Agents
Unselect all Agents
To send Agent detail to a Property, place a tick in the check box in the 'Selected' column (1). You may select all Agents by clicking on the 'Tick All' button (a), or select none by clicking on the 'Tick None' button (b) on the top pane of the module. Once these have been selected, click on the 'View Properties' button (2) located on the top pane.
The properties for Agent dialogue box display the selected Agent name and code, and all available properties for sending the Agent to. To send the Agent details to a Property, highlight the Property and select the 'Send to Property' button. This action queues the Agent detail for sending and progress may be viewed on the interface monitor.
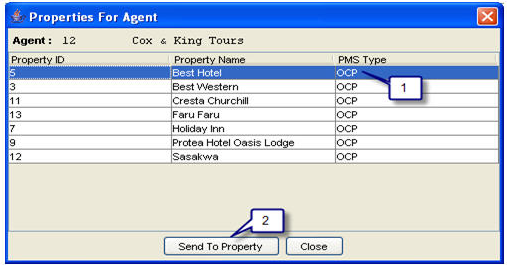
Figure 18. Interface Send Agents Screen 2
Legend:
Select the Property where the Agent detail should be sent
Select ‘Send to Property’ to initiate the action of sending
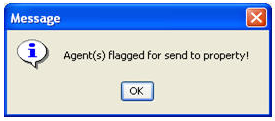
Figure 19. Interface Send Agents confirmation Screen
As a confirmation, the above message is presented to confirm your action.
How does it pull through to Apex?
- All new agent profiles will be “Inactive”. The Apex administrators must de-activate this setting.
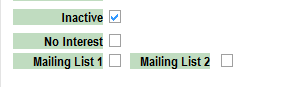
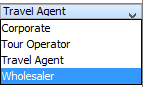
- eRes agent profile types Travel Agents, Tour Operators & Wholesalers will send to the Debtor / Agent Masters
- eRes agent profile types Corporate will send to the Company Masters.
7.4 Allocation Download to PMS
The Apex interface does not support this functionality.
7.5 Future Reservations Download to PMS
Once the mapping between eRes and Apex is complete and all the eRes reservation information was amended accordingly, you may now send all future reservations from eRes to the PMS.
If the reservations are already in Apex, you must not send the reservations to the PMS as it will cause duplicates.
1. Rather go into Apex and insert the CRS number into the reservations.
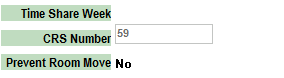
2. Once this is done, you may now send all the reservations from eRes. The PMS confirmation numbers will now link themselves to the correct reservations in eRes.
3. Be advised that the eRes information will update / override the Apex booking.
Go to Tools / System Administrator / Interfaces / PMS / Send Future Reservations.
Send future reservations functionality enables the CRS to send a bulk load of reservations to a PMS.
When new properties go live with PMSs that interface with eRes® as the CRS, this function may be used to dump future reservations from a specified arrival date. The reservations for one Property are sent to the Property selected from the dropdown menu. The 'Start Sending' button initiates the bulk send process.
You will need to do this for each applicable property.
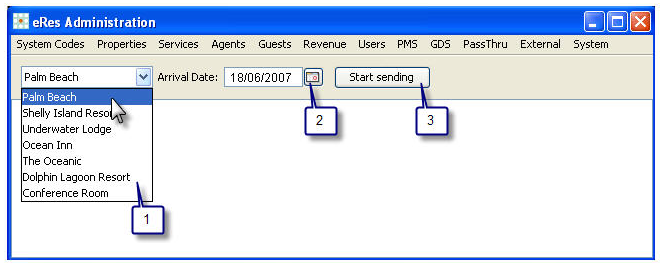
Figure 20. Interface Send Future Reservations Screen
Legend:
Select the Property for which reservations are to be sent from the dropdown menu.
Enter the arrival date.
Select 'Start Sending'.
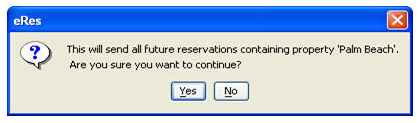
Figure 21. Interface Send Future Reservations Screen 2
After 'Start Sending' indication a confirmation message appears to verify your decision. Select 'Yes' to start the sending process or alternatively select 'No' to decline and return to the previous screen.

Figure 22. Interface Send Future Reservations Screen 3
Reservations to be queued message indicate the quantity of reservations that will be queued for sending. Notice that more properties are listed in this message than selected in the first step of the Send future reservations module. The reasoning behind this is that multiple itinerary line reservations, associated with the Property selected, has to be sent in conjunction with the primary selected Property, as they all form part of the same reservation.
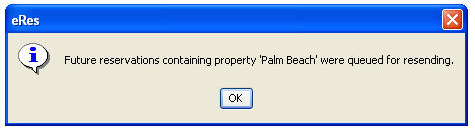
Figure 23. Interface Send Future Reservations Confirmation Screen
Selecting 'Yes' on the previous dialogue queues the reservations for sending and confirm the action with the above message. The procedure is now complete. When the previous message was declined, you will find yourself back on the first screen.
7.6 Interface Monitor
Every time reservations, Agent master files, allocations or Rates are saved (new or amend) a message is queued for sending to the properties to update any Reservation, Agent, Allocation or Rate information on the Property side. The interface monitor displays items that are waiting to be sent, items that have been sent but await a reply and items that have errors associated with them. Sometimes the information does not reach its destination, or the receiving application declines the request to update information. In situations like this the receiving application sends an error message back to eRes® advising details pertaining to the decline. These error messages that are generated by the interfacing applications are vital for the resolution of the current, and for any possible future problems. Messages are therefore recorded in the interface monitor for prompt action by an administrator.
These messages can be monitored in eRes under Tools / System Administrator / Interfaces / PMS / Interface Monitor.
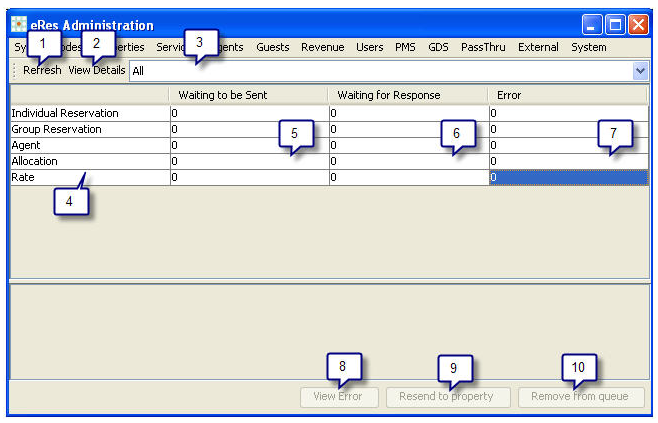
Figure 24. Interface Monitor Screen
Legend:
Refresh – Refresh the current data being displayed on the interface monitor.
View Details – View the details for the PMS interface selected on the dropdown menu in '3'.
PMS interface selector – Select the PMS interface for which details are to be displayed on the interface monitor.
Queue items.
Number of items in the queue – Waiting to be sent.
Number of items awaiting response – These items have been sent and should be received by the PMS. The PMS processes this information and if it’s a reservation, the reservation is recorded in the PMS, and if successful, a confirmation number is sent back to eRes® which is recorded on the reservation.
Number of items with errors – Displays the number of items with errors.
View Error – Highlight a cell in a column (e.g. Error column) and select this ‘View Error’ option which displays details pertaining to the error.
Resend to Property – Any item in the ‘Waiting for response’ or ‘Error’ column may be selected for resending. Highlight the required cell and select ‘Resend to Property’.
Remove from Queue – Removes a highlighted line item from the queue.
Viewing Interface Monitor Details
When viewing the interface monitor, one notices that only a number of items in a specific category are present at first glance. To see details pertaining to the number of items being displayed, click on the interface dropdown menu and select the interface type you wish to view, or alternatively select 'All' to view details for all connected interfaces. Once the required interface(s) are selected, click on the 'Refresh' button to display the numbers of items per category.
Viewing the details pertaining to the numbers on the interface monitor requires you to highlight the appropriate item, and placing the cursor on the category to be displayed. Select 'View Details' which displays the details for the item and category highlighted, provided the category doesn't have zero items.

Figure 25. View Interface Monitor Details
Legend:
Select the appropriate interface type, alternatively select 'All'.
Refresh the screen to show the newly selected interface details.
Select the item to be displayed. Notice a white box where the cursor is placed. The cursor's location determines what item details are displayed.
Select 'View Details' to display the details pertaining to the item selected in '3'.
The details are displayed on the bottom pane.
7.7 View the Message Log
This module allows the user to view PMS messages sent between PMS and CRS, as these messages are stored in the eRes® data base.
Go to Tools / System Administrator / Interfaces / Message Log
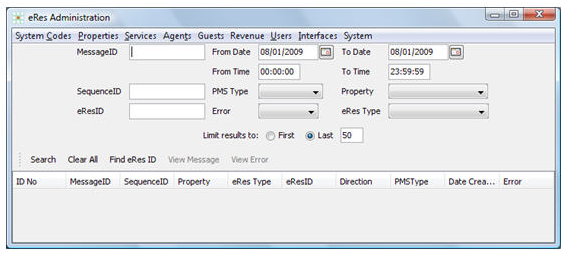
Figure 26. View Interface Messages Screen
View message log screen descriptors:
8. MOST COMMON ERRORS THE INTERFACE PRODUCES WHEN THE INFORMATION DID NOT GO DOWN TO THE PROPERTY
8.1 What it means to have messages in the “Waiting to be Sent” Queue
Interface communication is initiated by PMS which sends a HTTP request message to eRes®. eRes® recognizes the Property sending the request and in turn transmits the queued messages.
Messages still in this queue means that the PMS have not sent their request (GET) message to prompt eRes to send the new information to them.
How to resolve the issue:
1. The eRes administrators must contact the property and advise them to check their internet connection.
2. The property must restart their interface.
8.2 What it means to have messages in the “Waiting For Response” Queue
Each message that eRes sends to the PMS must receive a confirmation message in turn or it will remain in this queue. It will either be a successful message or the PMS confirmation number.
Once the changes have been made the eRes administrator can highlight the specific reservation message and resend the message or remove it from the queue.
How to resolve the issue:
1. The eRes administrators must contact the property and advise them to check their internet connection.
2. The property must restart their interface.
3. Apex will sometimes not accept certain criteria in the reservation. This means that eRes is sending the reservation to the property, but their system is not accepting it and therefore not responding with a confirmation.
8.3 Messages with Errors and how to Resolve them

Once the changes have been made eRes will automatically resend the messages by moving it to the Waiting to be Sent queue.
Alternatively, the eRes administrator may highlight the reservation message (in the waiting for response or error queues) and resend the message or remove it from the queue.
Schema validation error. Error Message: string length (0) is less than minLength facet (1) for StringLength1to16 in namespace http://www.opentravel.org/OTA/2003/05
The Title field in the reservation is blank.
The eRes administrator need to pull through a title in the reservation.
Schema validation error. Location of invalid XML: [InvBlockCode] Error Message: string length (34) is greater than maxLength facet (16) for StringLength1to16 in namespace http://www.opentravel.org/OTA/2003/05
The allocation name is longer than 16 characters.

The eRes administrator needs to shorten it under Tools / System Administrator / Agents / Allocations

Schema validation error. Location of invalid XML: [Code] Error Message: string value 'MIX' does not match pattern for ISO3166 in namespace http://www.opentravel.org/OTA/2003/05
Country code may not be more than 2 characters long.
eRes administrator must amend the country codes under Tools / System Administrator / System Codes / country Codes
eRes administrator must amend the Agent region country codes under Tools / system Administrator / Agents / Regions
Schema validation error. Location of invalid XML: [PhoneNumber] Error Message: string length (41) is greater than maxLength facet (32) for StringLength1to32 in namespace http://www.opentravel.org/OTA/2003/05
The Telephone, Fax or Cell phone field in the reservation is too long. It can only support up to 32 characters.
The eRes administrator needs to amend this field in the reservation.
Schema validation error. Error Message: Expected element 'Rate@http://www.opentravel.org/OTA/2003/05' before the end of the content in element Rates@http://www.opentravel.org/OTA/2003/05
Reservations without valid rates will have “Rate TBA” in the itinerary line.
eRes will give the Rate TBA if there is no valid rate code or up to date rate seasons linked to that property / room.
The eRes administrator needs to go into the reservations and pull through valid rates or update their rates in eRes.
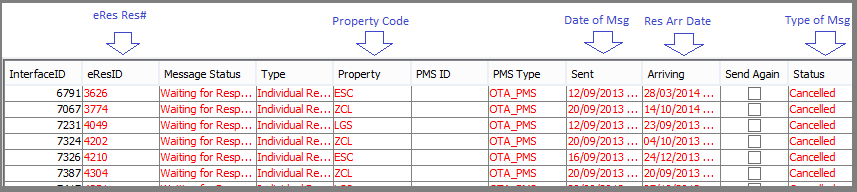
Reservation cancelled before sent to property
It means that the reservation “Cancel” message was sent to the PMS before the “New” message was delivered.
The eRes administrator must contact the property and confirm that the reservation is not in the PMS and remove the “New” message from the queue.
[OTA] [RES] [ERROR] : ADODataSet1: Field 'FolioNumber' not found
eRes administrator to open the Reservation Number and resave to send down to the Property.
Schema validation error. Location of invalid XML: [RoomTypeCode] Error Message: string length (0) is less than minLength facet (1) for StringLength1to16 in namespace http://www.opentravel.org/OTA/2003/05
This means that the Room Type Code is no longer in use and is not built in the PMS.
The eRes administrator must amend the Room Type by removing the Itinerary Line and adding the correct Room Type to the Reservation and saving it.
Or there is no PMS code in the room configuration. The eRes administrator must obtain the Apex room type code and link it to the room type in eRes under “PMS Code”.
Schema validation error. Location of invalid XML: [GuestCount] Error Message: Element not allowed: GuestCount@http://www.opentravel.org/OTA/2003/05 in element GuestCounts@http://www.opentravel.org/OTA/2003/05
This seems to indicate that there is an @ sign near the place in the message where the number of guests is indicated and it should not be there.
Deposit Error Code: Property returned error code: 6118 with error: Deposit transaction posting error occurrred: The invoice has already been closed
The Property already close the folio and cannot accept any additional deposits via the interface.
The eRes administrator is welcome to contact the HTI Support office for any additional assistance with the above or unknown errors – htisupport@htihospitality.tech
Related Articles
Booking.com NebulaCRS Interface Mapping
1. Introduction The Booking.com interface is available for direct connection to the Booking.com channel from NebulaCRS. All future enhancements and modules will be made to this interface going forward. The Booking.com eRes and Booking.com Nebula ...Updating eRes and NebulaCRS URLs
For clients and partners who are still connecting to eRes / NebulaCRS by using the endpoint URL's/ Shortcuts/Links which contain the element apps.hti-systems.com please update this element to nebulacrs.hti.app to connect to eRes/NebulaCRS instance - ...How and where to check for a failed or lost eRes/NebulaCRS reservation?
This article is to assist users in locating a reservation that was made by Central Reservations on eRes or a channel such as Booknow or Booking.com. If a reservation was made through a channel it may have failed to integrate in one of two places. The ...NebulaCRS and Additional Modules URLs
Each NebulaCRS instance and Module has a slight variation to its URL, please see below the applicable links required for NebulaCRS and the relevant modules. instance - refer to your NebulaCRS name. This your unique identifier. This element does not ...eRes Runtime warning
eRes Runtime Warning If you are receiving the below warning when attempting to open eRes Front End Java Application, please follow the below steps; Warning Screen 1 Tick "I accept the risk and want to run this application" and then click on the "Run" ...